Note from the Author
NOTE: This blog entry and these configurations are specific to only a few versions of System Center 2012 Configuration Manager R2 (CU3, CU4, and CU5). If these configurations are done on any version of ConfigMgr before CU3, they will simply be ignored. If these configurations are done on any version of ConfigMgr after CU5 (2012 SP2 or 2012 R2 SP1 and above), they will work, but the end result can be accomplished with a single checkbox and minor boundary group reconfigurations instead.
Scenario
While I was working with an organization on a project for Configuration Manager, I noticed that some of their clients in New York were assigned to the management point in California. Investigating further, some of the United Kingdom clients were also being managed by the California management point, and others were managed by the New York management points. Though this works, there’s absolutely no need for a client in New York or the United Kingdom to jump across the country (and the “pond,” for that matter) for client management. When researching this behavior a little more, I realized their version of Configuration Manager was only up to 2012 R2 CU5 – pre SP1. This means that they have the ability to define preferred management points, but instead of checking the box in the hierarchy settings (like you can do in SP1 and higher) and making a few boundary group reconfigurations, they have to define a registry value that tells the clients which management point(s) they’d like the client to cycle through during a Location Service Rotation. The only drawback to this solution is if the preferred management point for a client goes offline or is otherwise not working, then the client is essentially unmanaged until the management point is back online, the registry value is deleted, or updated to a working management point. To understand fully how this registry value works and to see an example, Justin Chalfant wrote a blog on TechNet that exemplifies how to set the registry key manually and review the results of the clients switching to their preferred management points. My solution below does the same thing; however, I am leveraging Configuration Items and Baselines to run scripts and automate this feature for a mass amount of clients.
Understanding
The above hierarchy is a simple implantation – single Primary site in New York with a dedicated management/distribution point in New York and California. They also have a couple distribution points scattered around the continental US (Texas, Minnesota, and Brooklyn), as well as a few in other countries (United Kingdom, Australia, Argentina, and France).
In all, we only really need to segment this hierarchy into two categories based on the management points – clients in California and clients not in California. We want to force the clients in California to be managed by the California management point (SCCMMP-CA) and all the other clients to be managed by the New York management point (SCCMMP-NY).
For this solution I’m going to leverage a single Baseline Configuration (with a single Configuration Item) to:
-
Add the registry value “AllowedMPs” to HKLM\Software\Microsoft\CCM - this is the value, when present, that tells the client which preferred management points to leverage for client management.
-
Dynamically, update the registry value based on the current Active Directory Site the machine used to log into the domain - this is a multi-value string that lists which management points you prefer the client to leverage for client management.
The Logic
Configuration Items are a powerful tool when properly used in Configuration Manager. In this scenario, I create a single Configuration Item, add it to a baseline and simply deploy it to all machines with a client installed. This Configuration Item will have two PowerShell scripts – a detection script that checks if the “AllowedMPs” registry value is already present (and deleting it if it already exists) and a remediation script to discover which AD site was used to login, create the registry key, and set the value to proper management point(s) for that client.
Part of this challenge was realizing that the majority of their fleet is running Windows 7 SP1 and only having PowerShell v2.0 installed. Some of the logic in the scripts may seem antiquated, but that is done in consideration for the clients that will be running these scripts. It also relies on the fact that your Active Directory Sites/Subnets association is tidy and as up-to-date as possible. If a subnet is not listed for a particular site and the client logs in, it may not be able determine which site it’s using for authentication, and the property that we’ll be pulling from WMI will be inaccurate, meaning the management point(s) we define may be inaccurate as well. If you only have one site in Active Directory but still have multiple management points (specifically, geographically distributed management points), then you may want to consider defining additional sites and associating the appropriate subnets to ensure the designated sites have coverage and can accurately locate the closes DC along with the closest management point.
That said, let’s look at the scripts.
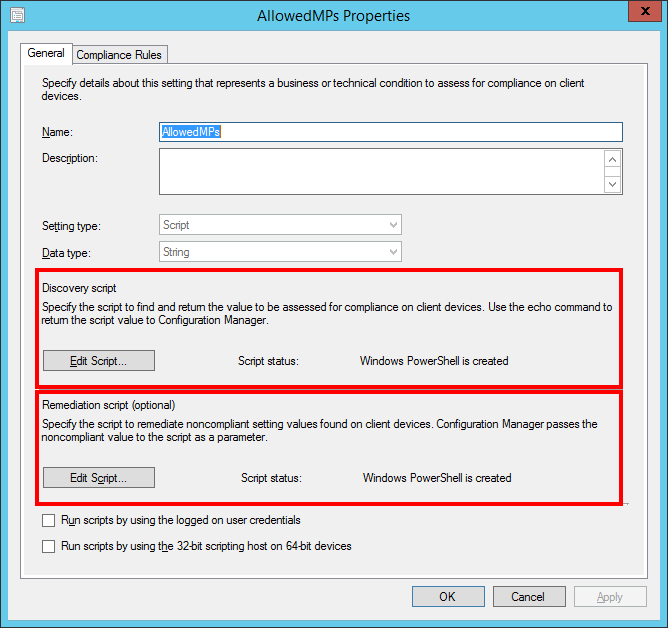
Screenshot of the CI's settings - General tab
Discovery Script
The discovery script, at least in this case, is not so much a “discovery” as it is a “reset” script. I’m using it, in this specific case, to look and determine if the “AllowedMPs” registry value is already set in the registry. If it isn’t, then it returns the value “False.” If it is present, then it’ll delete the registry value and will return the value “False” as well. I did this in order to make this dynamic. If the registry key is already set for a client in California and that laptop travels to New York for a few weeks, when the Configuration Item runs, it’ll determine the registry value is already there and do nothing to remediate the fact that the client is leveraging California resources for management while it’s in New York. Not ideal, right? Right. So, I made it so the detection script will always delete the “AssignedMPs” registry value and the remediation script will re-write it with the proper values.
# Create a function that can read the specified registry value

function Test-RegistryValue {

param ([parameter(Mandatory=$true)]

       [ValidateNotNullOrEmpty()]$Path,

       [parameter(Mandatory=$true)]

       [ValidateNotNullOrEmpty()]$Value)

try {Get-ItemProperty -Path $Path | Select-Object -ExpandProperty $Value -ErrorAction Stop | Out-Null

return $true }

catch {return $false}}
# Send the initial results of the registry value existence to a variable
$result = Test-RegistryValue -Path 'HKLM:\SOFTWARE\Microsoft\CCM' -Value "AllowedMPs"
# If the results are True, delete the registry value
if ($result -eq $True)
{Remove-ItemProperty -Path HKLM:\SOFTWARE\Microsoft\CCM -Name "AllowedMPs"}
# Rerun the function to spit out the "false" return in order to allow remediatiation
 Test-RegistryValue -Path 'HKLM:\SOFTWARE\Microsoft\CCM' -Value "AllowedMPs"
Remediation Script
The remediation script, like I’ve previously mentioned, simply runs an nltest command to determine which site the machine is currently running. Then, based on which site is discovered, it sets an array of the management points you determine are suitable for that site. As I mentioned previously as well, this will rely heavily on the notion that your Active Directory Sites/Subnet association is as tidy and up-to-date as possible. This way, you don’t have any roaming clients using up precious network resources for authentication and logon purposes.
# Declare the hostname of the local machine

$hostname = hostname
# Create a function for determining the current AD site of the machine
# You shouldn't need to edit this area as all it's doing is cleaning up the text from the nltest command
function Get-ComputerSite($ComputerName)
{$site = nltest /server:$ComputerName /dsgetsite 2>$null
if($LASTEXITCODE -eq 0){ $site[0] }}
# Delcare which site in which the machine is currently running
$site = Get-Computersite $hostname
#################################################################
###### Update below to match your sites and preffered MPs #######
#################################################################
### Declare your arrays for the values to be created in the regkey
### example: ($site -ne or -eq "ADSite")
### example: {$value = @("MP1","MP2","MP3")}
### NOTICE: I'm using -ne (not equal) operator in the first IF statement and -eq (equals) in the second
### You may need to use all -eq, depending on your environment
If ($site -ne "YOUR-AD-SITE1")
{$value = @("MP1.YOURDOMAIN.COM","MP2.YOURDOMAIN.COM")}
If ($site -eq "YOUR-AD-SITE2")
{$value = @("MP3.YOURDOMAIN.COM")}
#################################################################
#################################################################
# Powershell command to write the registry key based on the information deteremined above
 New-ItemProperty -path HKLM:\SOFTWARE\Microsoft\CCM -Name AllowedMPs -PropertyType MultiString -Value $value
Implementation
I took the liberty for you, dear reader, to generalize then export this Baseline (configuration item included) from my ConfigMgr environment. The link for the CAB file is below. Before you deploy it for testing and/or production, be sure to update the PowerShell scripts where it matters when importing it into your environment (remediation script – in the “IF” statements and the arrays for each, as shown in commented-out lines in the script).
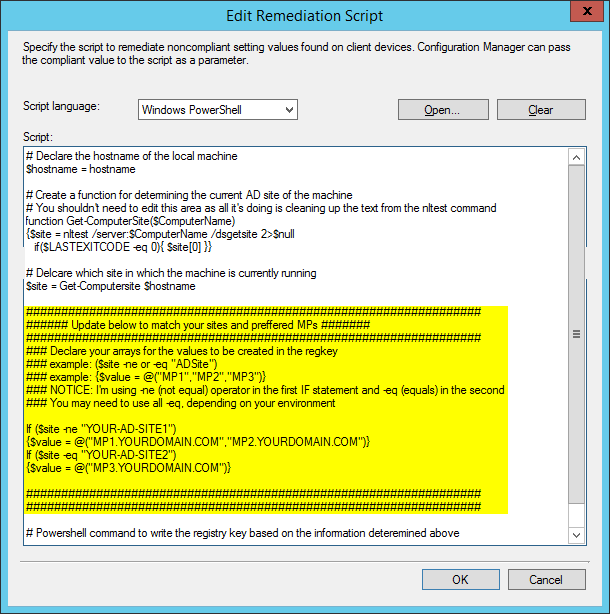
Remediation script with highlighted area for customization
After thorough testing, I deployed this baseline to a collection that encompasses all my managed clients. I, of course, checked the box that allows remediation when a machine is found non-compliant, and I also had it set to run once a day. This, and the detection script, is what makes this baseline dynamic. When it's run once a day, it deletes that "AllowedMPs" registry key and remakes it based on today's variables.
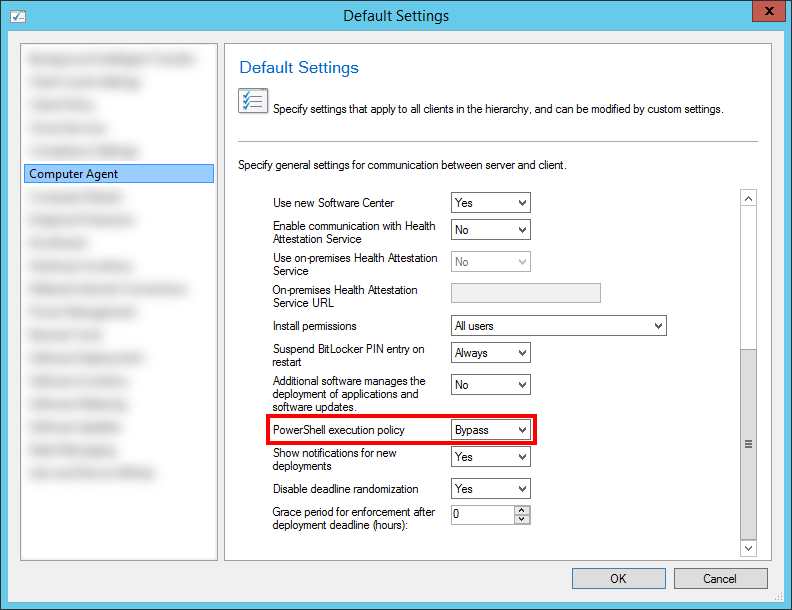
Lastly, another change I had to make to make this work (since these scripts are not signed) was to create and deploy a custom client setting that allowed SCCM to run unsigned PowerShell scripts. Alternatively, you can have these scripts signed. The client setting that allows unsigned scripts to run from SCCM is shown below.
In Closing
All in all, as you may have now come to realize, these settings and configurations are essentially obsolete now that newer versions of ConfigMgr (2012 R2 SP1, or SP2 and higher) have this functionality baked into Boundary Groups. Nowadays, you can use Boundary Groups to specify distribution points, state migration points, and now management points for the clients that are within the specified boundaries. However, I found that this is definitely good practice if you’ve never had to build a Configuration Item and Baseline before, and I hope it comes in handy for someone who may be land-locked into a specific version of ConfigMgr that doesn’t yet have this native capability. Have more questions? No worries, just get in touch with Sparkhound.
Information and material in our blog posts are provided "as is" with no warranties either expressed or implied. Each post is an individual expression of our Sparkies. Should you identify any such content that is harmful, malicious, sensitive or unnecessary, please contact marketing@sparkhound.com
Share this

Tip: Approve all In Progress Activities in Service Manager

Query Operations Manager Notification Subscription Data via SQL