As a Microsoft Gold Partner, we at Sparkhound receive many Microsoft-related requests. Recently, I was tasked with creating a customized start menu for a client that is looking to rollout Windows 10 to the company. They wanted the following:
-
To make sure that Internet Explorer, Cisco AnyConnect, the Office suite were segmented in their own grouping on the Start layout.
-
To still allow the user to add and customize their Start Menu layout going forward but prevent them from editing or removing the mandated grouping of IE, AnyConnect, etc.
With the release of Windows 10 v1511 came the capability to apply a Partial Start Menu Layout. This gives the company the ability to deploy specific groupings to their machines while allowing their users to add and customize their own groupings.
Customize Your Start Layout
On any Windows 10 machine, setup the groupings you would like to push out to your users. Here, I’ve specified Internet Explorer 11, Calculator, Notepad ++, and Windows PowerShell ISE. I also created another grouping for my Office applications.
Export and Edit Your Start Layout
On that same machine, we need to export the XML that holds the specified configuration for your desired Start Layout. Open PowerShell with administrative rights and run the following command:
Export-StartLayout –Path C:\Workspace\StartLayout.xml
The XML is pretty typical of what you’d find in any XML setting file – a common HTML-type format with brackets that open an element and then an accompanying bracket that closes that element. In Notepad++, it’s easier to see the groupings since it can read and color-code the text.
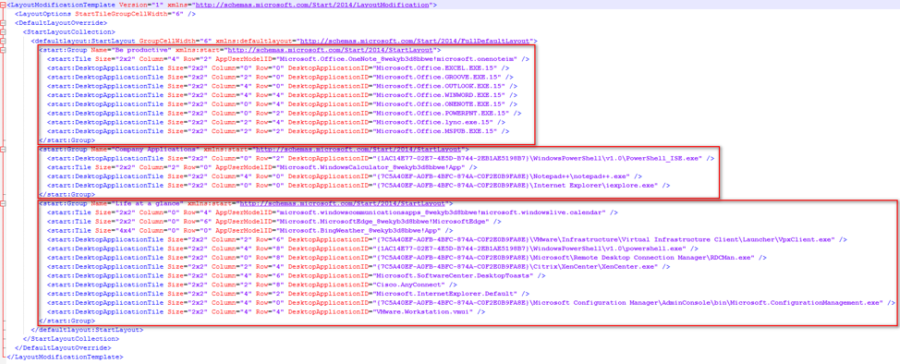
First, in the <DefaultLayoutOverride> section, we need to add a little code to let Windows know that we only want to lock down these specfic groups and that other groups can added, customized, and deleted at the user’s will. We’re going to add text to make it read as follows:
<DefaultLayoutOverrideLayoutCustomizationRestrictionType=”OnlySpecifiedGroups”>

The two groups that I want to push in a GPO are the groups “Be Productive” and “Company Applications.” You can name these whatever you want when you’re customizing the Start Menu originally, or you can edit the groupings names here in the section Name=”Name of Grouping”
I don’t care to push out the third grouping, so lets delete everything about that group, from the first <start:Group.. to the </start:Group>
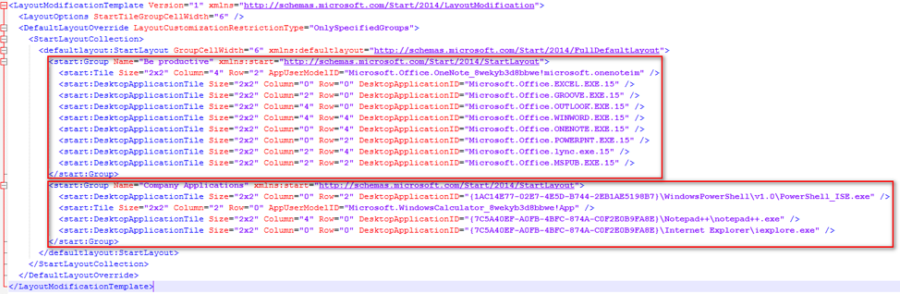
To ensure that the icon for Internet Explorer 11 stays once this is deployed via GPO, edit the line where Internet Explorer is defined as follows:
DesktopApplicationLinkPath=”%ALLUSERSPROFILE%\Microsoft\Windows\Start Menu\Programs\Internet Explorer.lnk” />

Note: We’re changing “DesktopApplicationID” to “DesktopApplicationLinkPath” and then pointing to a shortcut that DOES NOT yet exist. We will tell the GPO to create this shortcut on the machine. This way when the OS is upgraded to the next version of Windows 10, the Internet Explorer shortcut will be recreated in that same location.
Save and close your customized StartLayout.xml document. It’s best to save this on a network share as when/if you want to edit it later it’s in a centralized location where all the Domain Computers can access it. For a few of my clients that didn’t bark at me, I saved this file on the SYSVOL. For instance:
\\sparkhound.com\SYSVOL\sparkhound.com\scripts\StartLayout\StartLayout.XML
By default, your Domain Computers can access and read this directory for future changes/updates to the Start Layout.
Create Your StartLayout GPO
On a domain controller in your environment, make sure you have the ADMX templates for Windows 10 already installed and imported and then create a GPO using the following steps:
-
Create a GPO named something to the effect of “Win10StartMenuLayout” or whatever gets the point across using your standard naming convention, if one exists.
-
Edit the following settings:
-
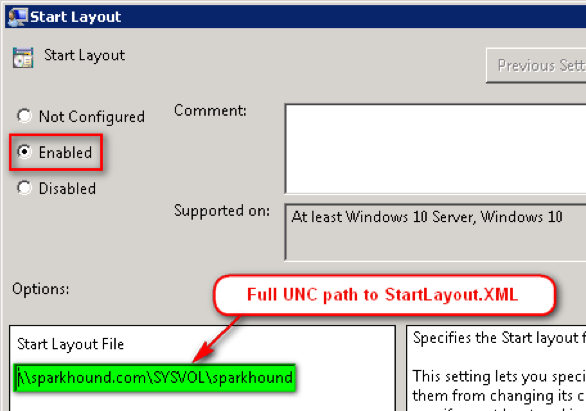
Computer Configuration > Policies > Administrative Templates > Start Menu and Taskbar Enable Start Layout and then point to the UNC of the customized XML.
-
b. Computer Configuration > Preferences > Windows Settings > Shortcuts >
i. Create a new Shortcut with the following settings:
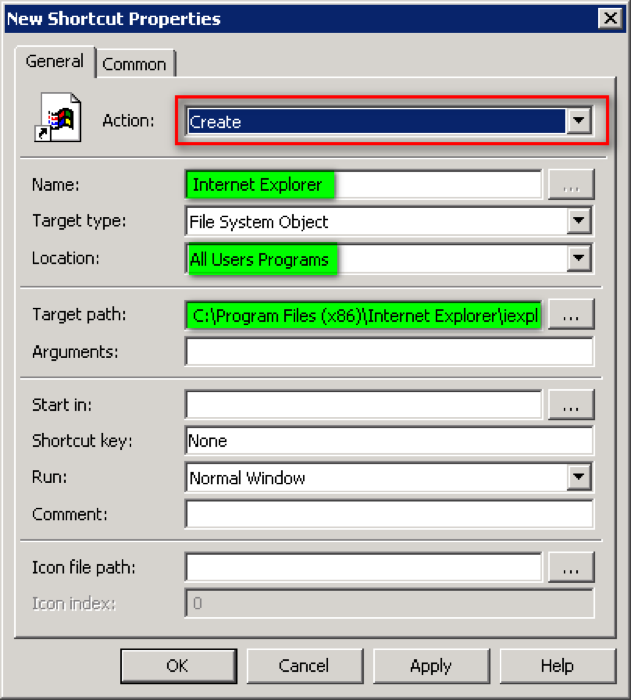
ii. On the Common tab, enable Stop processing items in this extension if an error occurs and then select OK to save your shortcut
3. Deploy the GPO to your OU for Windows 10 machines. If the applications that were specified in your XML are installed on the affected systems, they’ll automatically be grouped into sections, named as specified, and appear with a lock next to the name, indicating its applied via GPO. If a user has already logged into their system and created customized groupings, these groupings WILL NOT be overwritten. When any new user logs in, they’ll start with a fresh Start Menu that contains ONLY these groupings, to which they can add more if they like.
Updating the Start Menu / Adding Apps to Groupings
At times, you’re going to want to add an app or two to the currently deployed groupings. This is a relatively easy task once you understand how the tiles are placed using a “row/column” format.
Examining the XML you see a couple of common properties for each tile – size, column, and row. Commonly, the size of a tile is 2x2, which leaves enough room for the icon and the name of the application. A 1x1 tile only has the icon for the application. With that in mind, let’s move onto the placement of the tiles.
For those not familiar with a row/column setup, rows are part of a diagram that lay horizontally. For example, in the Excel spreadsheet below, rows 1, 2, and 3 are notated on the left and run horizontally. In contrast, columns A, B, and C are notated on the top and run vertically.

A tile that has Row=”0” and Column=”0” should be at the top left of that grouping. In the below example you can see that Internet Explorer is indeed in the appropriate place.
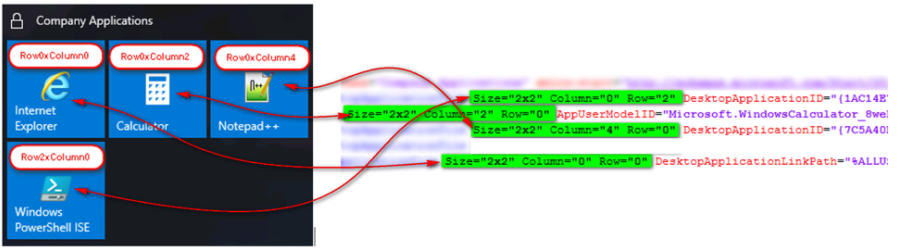
When adding a new tile to the example above, examine the next available slot, which would be Row=”2” Column=”2” since the size of the tiles are “2x2.”
I’m going to add a tile for the Software Center application in the XML. To find the name of the “DesktopApplicationID” that needs to be added to the XML, I simply found any Windows 10 machine, added the tile manually, and then exported the start layout using PowerShell.
Export-StartLayout –Path C:\Workspace\updatelayout.xml
Upon opening the referenced XML, we can see that the Software Center tile is listed as Microsoft.SoftwareCenter.DesktopToasts.

Copy this line to your production StartLayout.XML file and adjust the Row/Column values to match a spot that isn’t currently in use. In my example, this is Row=”2” and Column=”2”

Save your XML and ensure the timestamp is updated. The next time your machine reboots (since this is a computer policy), they’ll check the timestamp against the one centrally located and download the newest. Upon logging back in, you can verify the tile was successfully added to the Start Menu.
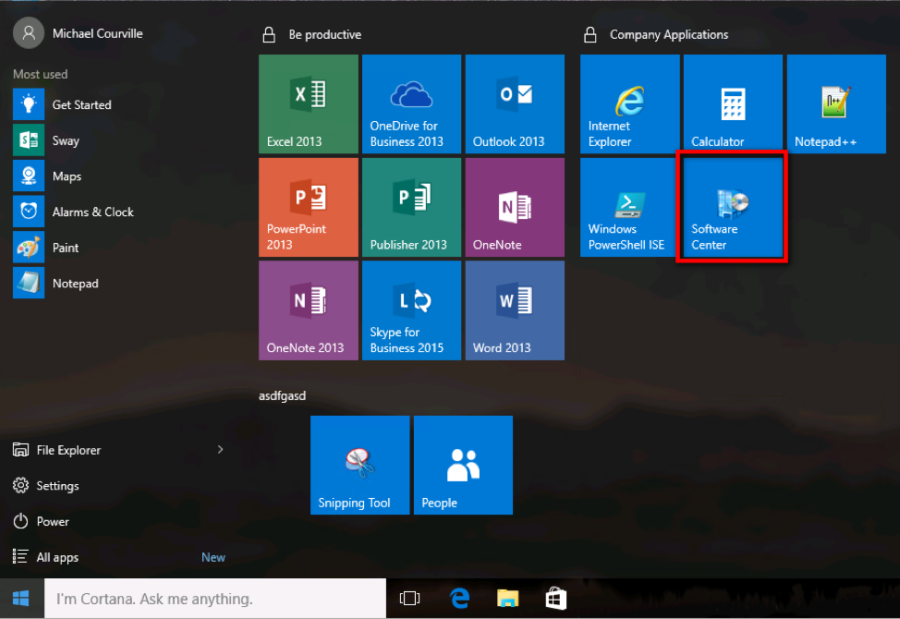
Finished product! Completely customized Windows Start Menu.
If you’re looking for more information just like this, Sparkhound is here to help. Take a look at some of our other blogs or get in touch with one of our professionals. Our team is more than happy to talk with you about what we can do.
Information and material in our blog posts are provided "as is" with no warranties either expressed or implied. Each post is an individual expression of our Sparkies. Should you identify any such content that is harmful, malicious, sensitive or unnecessary, please contact marketing@sparkhound.com
Share this

Azure MFA – A Cloud Solution that can also fit on-premises

Building graphs in SharePoint 2013 using JSOM