Part 2 – JSON Response and Workflow Verification
In the previous blog post, I showed you how to configure the HTTP Web Service Workflow action to query items in a SharePoint list. In this blog post, we’ll learn how to work with the response we received from the web service call.
Before we dive into the workflow, let’s take a step back and discuss the web service response. When our action calls into the list’s REST endpoint, the response we will receive will be in JavaScript Object Notation (JSON). I won’t go into too much details about JSON so if you are not familiar, you can review this post. In order for us to work with the response in our workflow, we need to understand more about the JSON response. I normally use a Google Chrome extension called Advanced REST Client. This tool allows you to enter a URL for your REST endpoint and shows you the response you will receive back from it. A great component of the tool is that it allows you to modify the HTTP request headers in your web service request. Remember this is important since we have to modify our HTTP accept header to tell SharePoint we want to receive the response in JSON.
So I will open up the Advanced REST client extension and enter my URL in the textbox at the top of the screen:

Verify that the radio button next to “GET” is selected since we are just retrieving data from the web service.
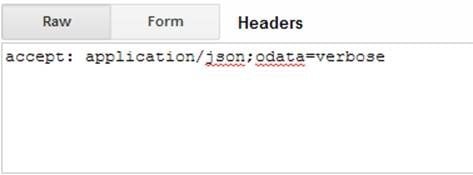
In the headers section of the extension, we need to set our “accept” HTTP header just like we did on our workflow action:
Now that we have specified the URL to our web service and the HTTP request header information, we can click the Send button. After you click the send button, you should receive a status of 200 OK and you will see the response at the bottom. If you click on the JSON button in the response area, it will be clearer to see the JSON result:
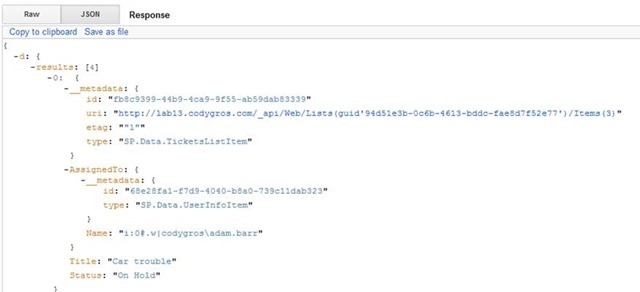
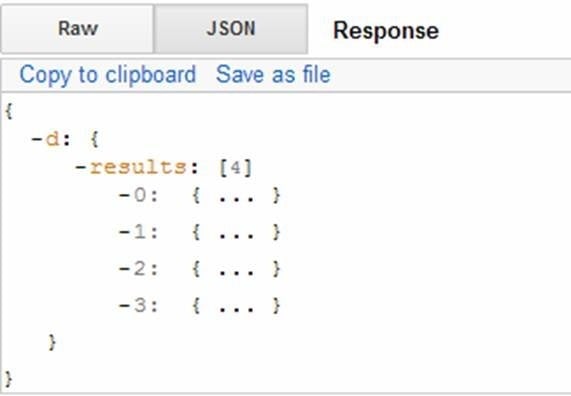
The screenshot above shows part of the response I received back from querying my Tickets list for items where the Status field is equal to “On Hold”. You will notice next to the results property it shows the number of items returned. In this example, we received 4 items back:
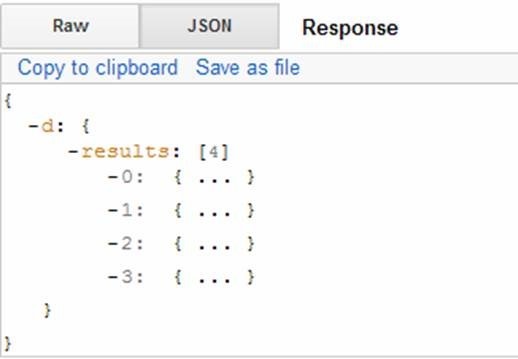
The screenshot above shows each item collapsed.
If you recall our URL contained a query string parameter called $select:
$select=Title,Status,AssignedTo/Name
The select parameter tells SharePoint which fields we are interested in. This is important because it only returns fields/data we are interested in. This minimizes the payload sent over the wire. Within each item, we see the following properties:
· __metadata
· AssignedTo
· Title
· Status
The __metadata property that is included in each item is included by default and contains information such as the item’s id, Uri, and type. The other properties contain the field values we told SharePoint to return in the select parameter. The “AssignedTo” property contains more information and we will discuss this in the last post in this blog series.
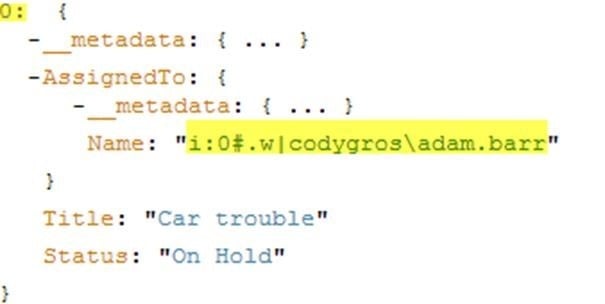
If we look at the objects returned, we will see the field values that we requested:
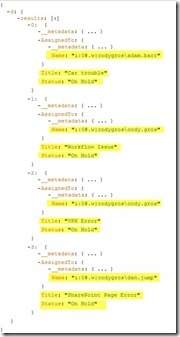
In the screenshot above, the field values we requested are highlighted. Also, notice the items returned are ordered by the “AssignedTo” field. To specify the order of items returned from a REST call, you should use the $orderby parameter. Our URL included the following:
$orderby=AssignedTo/Name
Now that we are familiar with the JSON result we will receive from our web service call, let’s go ahead and move forward in building our workflow. The next step we need to take is counting the number of results returned from our call. To determine the count, we will retrieve the results property from the “jsonResponse” dictionary variable. Remember the “jsonResponse” variable contains our response from the web service call. When we called the web service and viewed the response in the Advanced REST client, we saw the hierarchy of the JSON response:
To get just the results in a dictionary variable we will use the “Get Item from a Dictionary” action. This action contains three parameters:
1. Item by name or path – specifies the path where the item(s) resides
2. Dictionary – the dictionary variable to retrieve the item(s) from
3. Item – the variable to store the results in.
In the “Item by name or path” parameter we will enter “d/results” without the quotes. In the “dictionary” parameter we will select the jsonResponse variable. In the “item” parameter, we will create a new dictionary variable named “issueResults”.
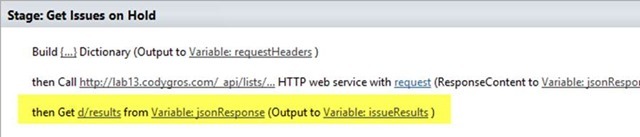
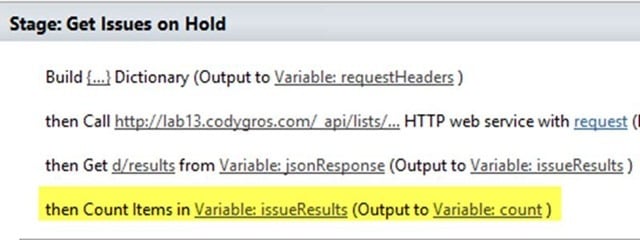
The value “d/results” tells the action to retrieve just the results from the “jsonReponse” variable and store it in a new “issueResults “dictionary variable. Now that we have just the results in a variable, we will count the results using the “Count Items in a Dictionary” action. This action contains two parameters:
1. Dictionary – specifies the dictionary variable that you want to count the items in
2. Output variable – specifies the variable that the count will be stored in.
In the “dictionary” parameter, we will specify the “issueResults” dictionary variable. We will leave the output parameter set to the count variable:
Next, we will use the “Set Workflow Variable” action to create a new variable and set its value. We will create a variable named “index” of type Integer and set it to 0.

Next, we want to loop through the items returned from our web service call. SharePoint 2013 includes the ability to loop within your workflows. In the ribbon, you will see the Loop button:
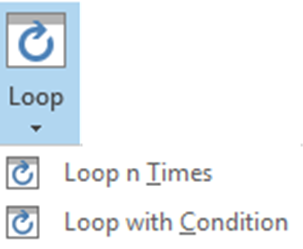
You have the ability to loop x amount of times or loop with a conditional statement. In our workflow, we want to choose “Loop n Times”. We will use the count variable we created above to tell our loop how many times to loop:

For now, we want to verify our workflow is working correctly and retrieving items from our Tickets list. So to test our progress so far, within the loop, we will set some variables and log them to the Workflow History List. We will use the “Get an Item from a Dictionary” action to retrieve some values. Click the “item by name or path” parameter and hit the button. In the string builder box, enter the following:

Do not forget the parenthesis around the index variable. For the “dictionary” parameter, select the “issueResults” dictionary variable. Output the results to a new string variable named “title”.

Right click on the above action we just created and select “Copy Action”. Right click under the action and select “Paste”. Now we will change the copied action’s path to:
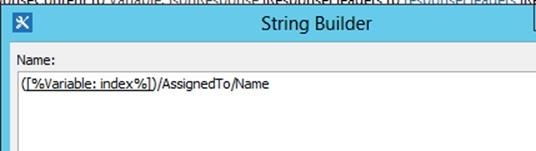
We will also change the output variable to a new string variable named “assignedTo”.
Now, we need to increment the index variable we created. To do this, add the “Do Calculation” and Set Workflow Variable actions. Set the parameters as shown below:

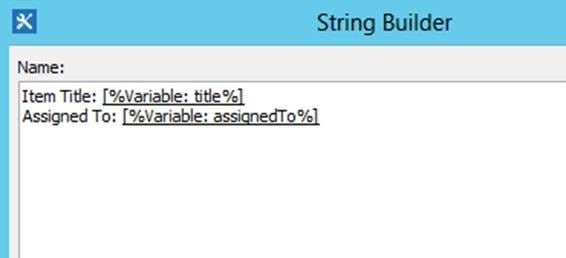
Now we will add the “Log to History” action to verify our workflow is working correctly so far. We will set the “message” parameter of the action to the following:
Our complete loop will now look like the screenshot below:
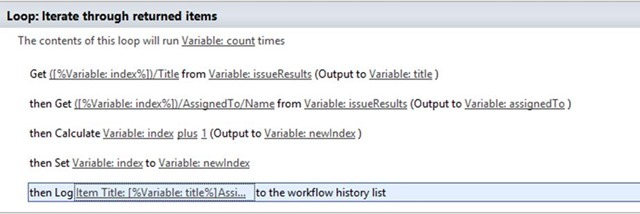
The “Get an Item in a Dictionary” action is retrieving the values from our “issueResults” dictionary variable. Remember this dictionary variable contains the result items from our web service call. We need a way to grab a specific item from the dictionary so we are using our index variable. We initially set the value of the index variable to 0 above our loop. So the first time the loop executes we are really specifying the following path in the “Get an Item in a Dictionary” action:
(0)/Title
If we look at our results from earlier, this is the object:
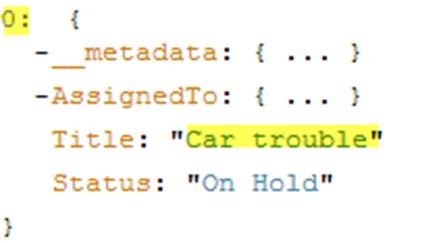
The second “Get an Item in a Dictionary” action is just changing the field we are retrieving:
(0)/AssignedTo/Name
Next time our loop executes, we want to retrieve the next result item from our dictionary. To do that, we are incrementing our index value by 1 every time the loop executes. Last but not least, for our testing/verification, we are writing some data to the workflow history list.
We need to add one last action before we test our workflow. At the bottom of the workflow, in the “Transition to stage” area add the “Go to a stage” action. Set the “stage” parameter to “End of Workflow”. Now, we can publish the workflow and test it. Once you publish it through SharePoint Designer, go to your SharePoint 2013 site, click on the Site Contents link. On the Site Contents page, click on to go to the site workflows page. On the site workflows page, click on the workflow to execute it. When it is complete, click on the workflow’s name under the “My Completed Workflows” section. Under the “Workflow History” section, the following entries are present:

You can see that I had 4 items in my Tickets list that were On Hold. You can see the values that are written for the item’s title and assigned to field. This verifies that our web service call to the list’s REST endpoint is working correctly.
This wraps up the second post in this blog series. We dived into the JSON response that is received when making a REST call to SharePoint 2013 list. We also continued to build our workflow and verified our web service call by writing values to the history list. In the next post in this series we will wrap up our workflow.
Information and material in our blog posts are provided "as is" with no warranties either expressed or implied. Each post is an individual expression of our Sparkies. Should you identify any such content that is harmful, malicious, sensitive or unnecessary, please contact marketing@sparkhound.com
Share this

Building graphs in SharePoint 2013 using JSOM

SharePoint 2013’s Call HTTP Web Service Workflow Action–Part 1