With IoT devices, we can capture real-time data about the physical world and use it in our software applications. Often the code needed to pull data and manipulate it can be quite large and complex which is unsuitable for an IoT device with a lower-tier CPU lacking a vast amount of RAM. Alas! There is hope, as moving the data processing elements of the code to the cloud can solve all the performance problems of the device.
Which cloud provider you use can affect scale, pricing, and other factors that companies may use to pick a provider. For consumers, however, there is not a ton of difference. For this post, we will use Azure, but there will be a future post in which I discuss some of the differences between Azure and Amazon Web Services.
You can download the example project located here. This project contains all the code necessary to connect a GrovePi enabled IoT device to an Azure IoT Hub, and the post below will explain the steps you need to take in Azure to get everything configured correctly.
Azure
In Azure, the first thing we are going to do is set up a resource group. A resource group is nothing more than a container of Azure services (called resources) that all serve the same purpose. After creating the group, we will add a few resources, but this is just a starter template, from here you can add any Azure resource to the mix to continue learning and exploring. The three resources we will be using today are:
-
IoT Hub
-
Stream Analytics
-
Cosmos DB
The first step is to get your Azure account and subscription set up. Go to the Microsoft Subscriber Portal and log in or create an account. You should have the free version of the subscription Visual Studio Dev Essentials. From the benefits tab of the subscriber portal, click Activate on your Azure free account and $200 credit. After getting that setup, head over to the Azure Portal and we can begin with creating the resource group.
Resource Group
-
Click Create a resource from the Azure Portal left sidebar.
-
Search for and select Resource group from the drop down.
-
Click Create at the bottom of the screen to start the create wizard.
-
Fill in required fields and confirm creation.
It’s as simple as that! Now let’s get to adding some resources to it!
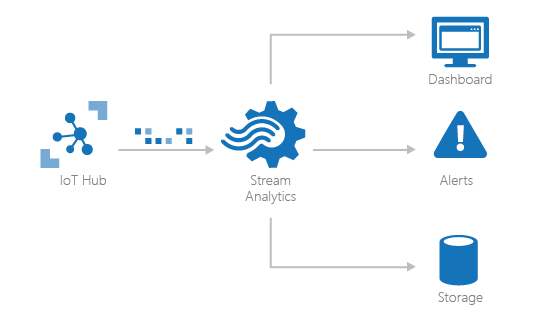
A common IoT cloud architecture, like the one described in this post.
IoT Hub
An IoT Hub is an area in the cloud for all the incoming IoT data you have coming in from physical devices. To create one:
-
Click Create a resource from the Azure Portal left sidebar.
-
Search for and select IoT Hub from the drop down.
-
Click Create at the bottom of the screen to start the create wizard.
-
Select the resource group you created before and fill in required fields.
-
Confirm creation.
With the IoT Hub created, we need to create an IoT device that we will register the physical device to. To do this:
-
Click All resources from the Azure Portal left sidebar.
-
Select your IoT hub.
-
From the IoT hub sidebar, select IoT devices from the Explorers section.
-
Click the blue + Add button at the top to being creating a device.
-
Give the device an ID and ensure the authentication type is Symmetric key and Auto-generate keys is checked.
-
Confirm creation.
At this point we could use the keys given to us by Azure to connect the physical IoT device to the hub but the data would come to the IoT Hub and do nothing. The hub collects the data but now we need something to move the data around for processing, and that is where Stream Analytics comes in.
Stream Analytics
Stream Analytics is like a router for your data. It has inputs and outputs and allows you to write both simple and complex queries to
handle movement of data. To create one:
-
Click Create a resource from the Azure Portal left sidebar.
-
Search for and select Stream Analytics job from the drop down.
-
Select the resource group you created before and fill in required fields.
-
Confirm creation.
I think you are starting to get the workflow here. In Azure, you have an idea, find a resource that fulfills that idea, and create it. Fair warning: this can be expensive to leave on, and some other resources can also be money spenders, so when your free credit runs out, look at your billing to see what you want to leave on and what you want to turn off. This stream analytics job can be configured in very complex ways, but we will look at a simple example after creating some storage for our data.
Cosmos DB
Cosmos DB is an easy to setup cloud storage that is document-based. Data is stored in collections on a database that are full of documents, which are like sheets or payloads of data. Cosmos DB is very nice to use as it is very easy to set up a Time to Live for your data which will automatically clear out data after a few minutes so that processed data does not accumulate over time, costing you big! To create one:
-
Click Create a resource from the Azure Portal left sidebar.
-
Search for and select Azure Cosmos DB from the drop down.
-
Select the resource group you created before and fill in required fields.
-
Confirm creation.
-
After it is deployed, go to the resource and follow the instructions to create the Items collection in the Quick start section of the Azure Cosmos DB sidebar.
-
After creating the collection, select it from the Collections list in the Overview section.
-
From the data explorer, expand the Items collection node and choose Scale & Settings
-
Turn Time to Live to On and set the time to 300 seconds.
I’m sure you saw some of those steps coming. Fear not, as that is the last resource we are going to create in this example. However, even though that everything is created, not everything is setup. The first thing to setup is the Stream Analytics. Afterwards we will look at modifying the code to work properly and finally testing everything at the end.
Configuration
Let’s start by configuring the Stream Analytics to put our IoT hub data into our Cosmos DB.
-
Click All resources from the Azure Portal left sidebar.
-
Select your Stream Analytics job.
-
From the Stream Analytics sidebar, click Inputs under the Job topology section.
-
Click the blue + Add stream input button to add an input.
-
Select IoT Hub from the dropdown.
-
Give it a name and select the IoT hub we created earlier from the dropdown.
-
Save the input.
-
Repeat the steps for creating an output, by going to the Outputs option of the sidebar.
-
Select Cosmos DB when creating the output and be sure to select the Cosmos DB you created earlier before saving the output.
-
Go to the Query section and paste in this query, then modify the Into and From statements to match your input/output aliases.
SELECT*
INTO
[OUTPUT ALIAS]
FROM
[INPUT ALIAS]
11. Click save to make sure the query is correct and working.
12. Go to the Overview section and make sure the Stream Analytics job is started, and if its stopped click the blue Start button at the top.
Now that the IoT hub data is going to our Cosmos DB we will get some data from the IoT hub itself to put in to the Visual studio solution.
-
Click All resources from the Azure Portal left sidebar.
-
Select your IoT hub.
-
From the IoT hub sidebar, select IoT devices from the Explorers section.
-
Select the device you created earlier from the list.
-
Inside you will find a Device Id and a Connection string (primary key)
Now to Visual Studio!
-
Open the example visual studio solution (download here).
-
Open the StartupTask.cs
-
Fill in your connection string into azureIoTConnectionString and device ID into deviceName found at the top of the class.
-
Ensure that your Temperature and Humidity sensor is plugged into Pin 2.
-
Run it!
If you need a refresher on how to get the solution up and running on your machine, check out my last post about getting everything set up! For this solution you will need to make sure you set the target as described in the post. To make sure it is working:
-
Make sure the code builds and deploys successfully.
-
Once running, you should be presented with some diagnostic tools while running.
-
From the bottom toolbar, choose Output.
-
Ensure that it is showing output from Debug.
-
There will be lots of messages relating to backgroundTaskHost.exe; these can be ignored.
-
Look for messages similar to the following:
Polling time is 60 seconds

Temp: 71.6F Humidity: 33%

01/03/2019 01:11:46  > Sending message: {

    Temperature: 71.6,

    Humidity: 33

}

01/03/2019 01:12:13  > Message sent successfully.
7. Go to the Azure Portal and open Cosmos DB.
8. Open the Items Collection node and choose Documents to review the documents.
9. You should see a document for each payload sent by the Visual Studio solution.
Troubleshooting
One thing you might run into a challenge is using the method from the first post and having internet access. Without internet, you will not be able to send data to Azure. There are many ways of putting the IoT device on the internet and have access from your computer. My setup is:
-
Raspberry Pi with GrovePi on it attached via Ethernet to a port on my router
-
Computer connected to router wirelessly
You can use a USB Wi-Fi module to gain Wi-Fi on the Raspberry Pi itself and keep the Ethernet to your computer as well. Also, if you are using the Raspberry Pi 3+ B there is onboard Wi-Fi, however the Win IoT Core Technical Preview that works on it does not support onboard Wi-Fi yet, but after it does you will be able to use that to gain internet access.
If All Goes Well...
If all has gone well, you have successfully used GrovePi sensors to gather data about the physical world, and sent that data to the cloud to be processed into storage, events, functions, and other fun cloud services. Congratulations! If you want to expand your architecture, here are a few things to check out that might inspire you:
-
Add an event hub and create a 2nd output from the Stream Analytics to it. Use this event hub as a function trigger for data passing through it (like high temperature, low humidity, loud sounds, etc.)
-
Similarly, you can build a function trigger on Cosmos DB item entry or update to review the data inside and manipulate or process it
-
Try using a SQL server DB instead of Azure Cosmos DB
Have fun trying out some new ideas with Azure IoT!
Information and material in our blog posts are provided "as is" with no warranties either expressed or implied. Each post is an individual expression of our Sparkies. Should you identify any such content that is harmful, malicious, sensitive or unnecessary, please contact marketing@sparkhound.com
Share this

PowerShell: Convert Exchange Distribution Groups to Office 365 Groups
.jpg)
Manage Azure VM’s With PowerShell